Using Dash (web console)
Dash is the dashboard, the web-based administrative console for Relay. The URL for Dash is https://dash.relaypro.com and you login with your Relay account userid and password.
When developing workflows, there are a few things that Dash is helpful for.
Device List
You can see the list of devices that have been activated on your account, and quite a few details about each. Click on the Main Menu -> Account -> Users. The device names are listed as the users.
Device Info Pane
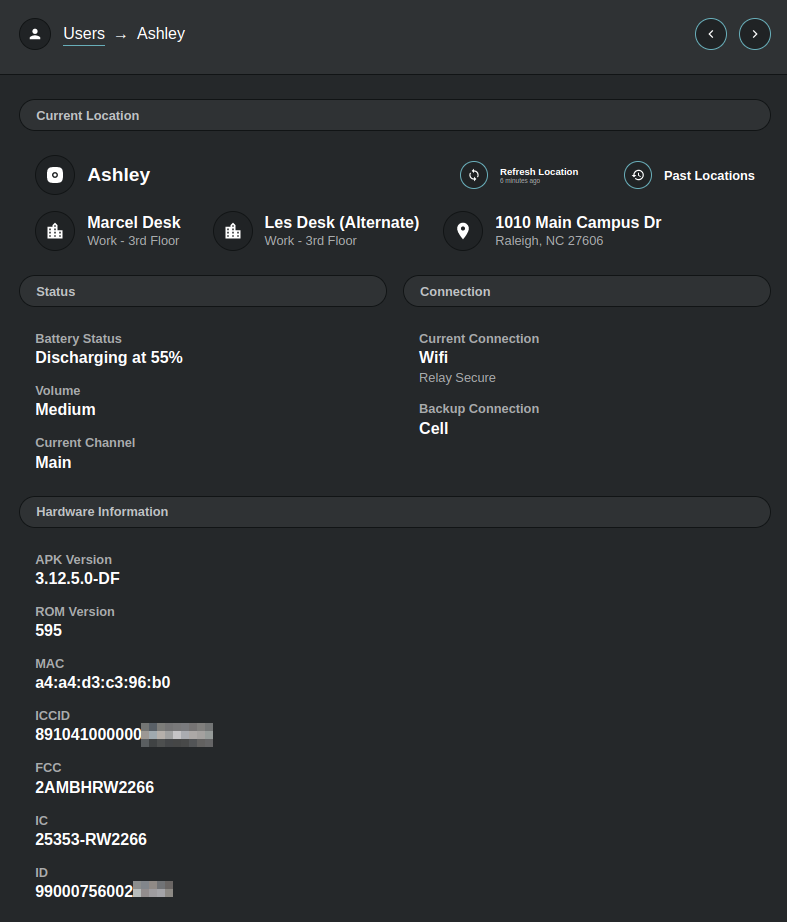
When you click on a User (device), it will display a pane that includes the following status:

In this pane, you can see quite a few things of interest:
- the device name "Ashley". This can be used in a URN such as
urn:relay-resource:name:device:ashley - the outdoor location, "1010 Main Campus Dr". Also above that is a button to refresh / re-fetch the location, and to view the location history. This can help you visually verify that GPS/outdoor location services are working. (Note that location services are disabled by default.)
- the indoor location, "Marcel Desk". This can help you visually verify that the indoor location services are working. Note that it may also display an alternate indoor location, which would be the next likely indoor location after the primary indoor location.
- the device's current channel, "Main".
- at the very bottom, the device ID, "99000756002xxxx". This can be used in a URN such as
urn:relay-resource:name:id:990007560023456
Device Info Menu
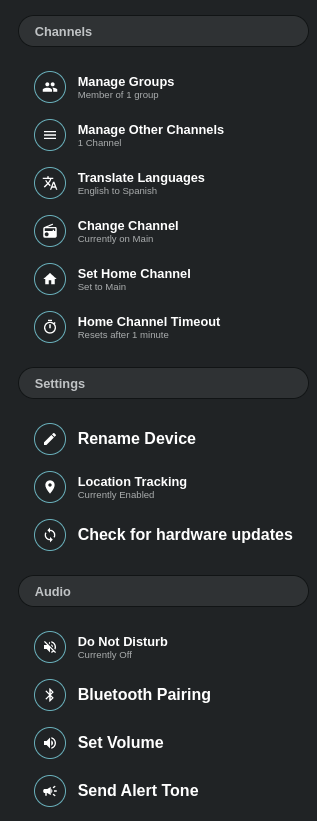
To the left of the status pane should be a menu, which looks like this:

There are several items of interest in this menu:
- Rename Device: this is where you can give the device a specific name, which can get used in a URN such as
urn:relay-resource:name:device:ashley - Location Tracking enablement: this is where you can enable/disable location tracking services for a specific device. By default, location tracking is disabled.
Although there is a menu button "Manage Groups", this is to control group membership for only this specific device. For creating new groups and modifying other devices' memberships, you'll probably want to use the Groups menu as described below.
Device ID / Name
The device ID (starts with "99000") and device name are visible on the status pane as described above. If you want to target a specific device in a workflow action, this is where you can find the device ID or device name.
Groups
Groups behave like a channel for voice communication. Creating groups and assigning devices as members to those groups is done with Dash. From the Main menu in Dash, select Account -> Groups. Here you can create a new group. And for that group, you pick which devices are members of that group.
When a device is a member of more than one group, the device can be on only one of these channels (groups) at a time. Pressing the Assistant button on the device (the button between the "+" and "-" buttons) multiple times will change the channel on the device (select a different group) and the device will speak out the group name that you moved to. Alternatively, you can hold down the Assistant button on the device and speak the name of the group that you want to move to.
Outdoor Location
First, you'll want to enable Location Tracking in the Device Info Menu, as it is disabled by default. This affects both outdoor and indoor location capability.
Once it is enabled, it will take several minutes for the device get its first GPS reading, because it takes a while to get initialized. After that, the outdoor location (street address) should appear in the Device Info Pane as described above.
When Location Tracking is enabled the device will re-read the location sensors every ten minutes. Location polling can be speed up to re-read every minute although this will impact battery life of the device. To enable high frequency location polling for a device search for "Location Polling" in Dash.
Dash provides a way to look at a graphical map view of the outdoor location. From the Main Menu select Location -> Outdoor Locations.
Indoor Location
Similar to Outdoor Location, you'll first want to enable Location Tracking in the Device Info Menu.
Indoor location service also requires extra setup, either with Bluetooth beacons or WiFi fingerprinting.
Once you have indoor location working, there are three ways to view the indoor location:
- the Device Info Pane.
- from the Main Menu, select Location -> Indoor Locations and you should see a tabular list.
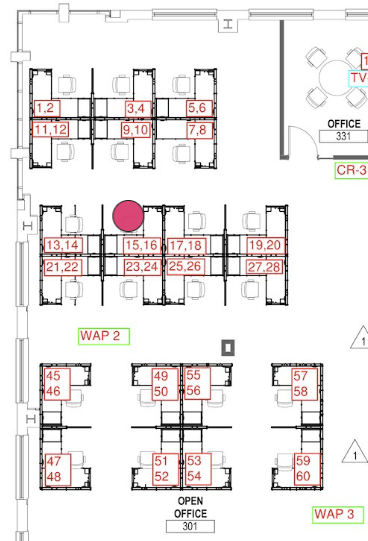
- if you have an image of the floor map (i.e., building blueprint), you can upload that, and Dash will render a pin on the floor map for a visual representation of the indoor location. This can be set up in Main Menu -> Location -> Building Admin -> Buildings (pick yours) -> Floor (pick yours) -> Add Image, and Edit Room Positions. To view the rendering, go to Main Menu -> Location -> Indoor Locations -> Floor Map (button is on the right). Then when a device is near an identified indoor location, it will draw a violet circle on the map like this:

Workflow List
In Dash's Main Menu there is a button for workflows. This is only for Panic Workflows, which is a built-in feature and separate from the workflows you are creating. Your workflows will not appear here, but instead are available via the CLI. So this button can be disregarded.
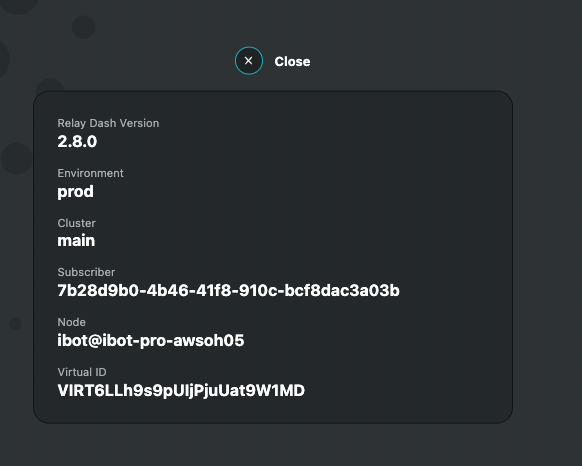
Subscriber ID
You can view your subscriber ID by searching in the top right hand corner for 'Version and Diagnostics'. It'll show you the following information, including Subscriber ID:

Updated over 1 year ago
